For the record, I will be the first to admit that a professionally executed reverse-tuck Class 1 eye splice on modern braided line adds an air of proficiency and seamanship to any boat. When I see a boat with braided line eye splices, I am more impressed than any amount of brightwork or varnish.
The finished art (and I use that term “art” deliberately) is what everyone notices. What nobody sees, though, is how the actual splice is concocted. (I use the term “concocted” deliberately as well.) Nor do they see you soaking your hands in hot water for 10 minutes afterward to reduce the pain and swelling from pulling and pushing the rope strands through one another!
The first reverse-tuck splice I ever tried took all day and used up 10ft of expensive double-braid. Even then, I didn’t want to show it to anybody. With practice, I’ve managed to do a few that are more professional-looking. But I’ve always needed an instruction sheet to remind me which bit of rope is trimmed here, and which bit goes there. To say it’s a complicated procedure is an understatement, a bit like “some assembly needed” on the box of the chandelier I recently put together for our dining room that nearly finished up in the garbage!
The rope company instruction sheet for a “double braid Class 1 eye splice” that I have has 10 stages of very detailed drawings, which I always need to refer to with every eye-splice. There are also a number of videos on the internet, showing slight variations in methods, all of which look frustratingly easy, but are far too quick to follow.
Unfortunately, there aren’t many attractive alternatives to a standard splice when you need to bend a thimble on the end of a line. You can, of course, do away with a thimble altogether and tie a bowline or put in a few half hitches, or you can just whip the line. However, these methods, in addition to being unsightly, all create unevenly distributed loads on the line, substantially weakening it as well.
Because I absolutely hate doing these types of splices, I decided to see if I could devise an easier way to effectively form an eye-splice around a thimble without having to resort to the aid of a professional. The word “effectively” needed to include strength, appearance and effort, in that order. Ultimately, after a lot of experimenting, trying to shove different parts of trimmed lines through the inside of the braided rope using Samson Ropes fids, I decided to fall back on the age-old method of whipping and parceling, but with modern equipment.

METHODOLOGY
The line I used to illustrate this article was brand-new 3/8in-diameter double-braided. I mention this because it can be almost impossible to do a reverse-tuck splice using worn or dirty braided line. With my method it doesn’t make any difference whether the line is old or new.
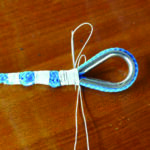
As a first step, I taped the line around the thimble using regular 3/4in electrical tape, leaving enough tail to be able to wind three separate whipping points. As a rule of thumb, the tail should be at least 10 times the diameter of the rope. After the tape was on I whipped the lines tightly together using waxed whipping twine over the top of the tape. Because they will eventually be covered with heat-shrink tubing, these whippings don’t have to be especially neat or tidy. The first whipping should pull the throat of the thimble together, winding one turn over the top of the other to make it as strong as possible. On a side note, it’s often recommended that conventional reverse tuck splices be whipped and sewn at the throat as well, because it adds strength and minimizes expansion at the throat, where the first sign of high load shows up.
My whipping uses the regular technique every sailor will know. There is no need to cut the loose ends flush as you would with an exposed whipping. Again, the ends will be buried in heat-shrink, which will also prevent them from coming loose.
I wanted to create a tapered splice, to make it at least look like a reverse-tuck and therefore carefully picked a quarter of the strands out of the outer cover and cut them off level with the first whipping. This is easy to do with any sharp-pointed instrument. The cut strands can then be pulled backward out of the cover and trimmed off.
After that I bent on a second tight whipping round the reduced line thickness, and removed another quarter of the outer case strands, paring them back to the whipping and cutting them off. This left about half the strands in the outer casing along with the whole of the inner core to be whipped a third time near the bitter end. This method does not reduce the inner core of the rope at all, adding significantly to the strength of the join.
To add further strength to the three whippings, I reinforced them by lock stitching sideways through both lines. Pushing a needle through the compressed line can be tough, but it does not need to look attractive, again thanks to the final step in the operation, sheathing the splice with heat shrink tubing, which effectively hides everything.
Shrink tubing finishes off the splice and protects the whipping from weather and UV sunlight. It is best to use marine-grade tubing, which has an adhesive inside that melts when shrinking, making the cover waterproof. Different colors are available and matching the color with the rope adds a nice touch. The tubing is best shrunk using a heat gun, but the shrinking can also be done with a hairdryer. The thing to be careful of is not damaging the outer cover of the line.
The completed assembly now looks very similar to a Class 1 eye-splice. Nobody can tell the difference, because they can’t see the underlying work.
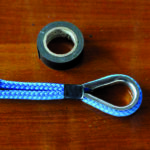
Starting out by taping the rope around the thimble
The first whipping finished

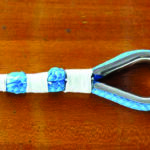
Removing a portion of the outer core to create a nice taper
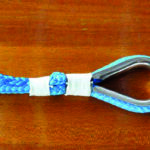
Two whippings down, one to go
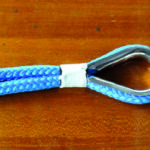
Note the taper with all three whippings complete
Lock stitching the first whipping
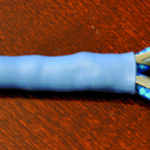
The finished eye, complete with heat-shrink tubing installed
HOME TESTING
Now that I had my loop, the next thing to do was see how strong it was; however, since I had no specific equipment with which to apply a load and measure it, I could only test it to destruction.
To conduct my test, I wound a few turns of 3/4in-diameter mooring rope around the foremast of my schooner, Britannia, and then passed it through a thimble I’d spliced into a 10ft length of 1/2in double-braid. The other end of the 1/2in line I wound four times round the warping drum on my Maxwell windlass, about 12ft away. After putting on a pair of safety glasses, I watched the line draw tight as the winch took the strain. There was some initial creaking from the securing rope as everything bedded down, but no movement on the splice.
After pulling a bit more I noticed the throat opening a little. With further pressure from the winch, the whippings began to stretch. By now the rope was absolutely steel-bar rigid, so much so I wondered if the actual line might part first as the splice continued to hold. The windlass was also beginning to strain, when, finally, with a final touch on the button, the splice exploded with a crack that left the splice shredded. Again, I had no way to measure the actual load on the line when it failed, but it was very, very tight, far exceeding any load I’ve ever used on my boat before.
Later I made another splice using the same 1/2in line, but this time I parceled it with marine grade shrink tubing. I sweated this to the splice with my heat shrink gun until the adhesive visibly extruded from both ends. I then let the glue dry for an hour, at which point the splice became hard and stiff.
I repeated the stretching test, I couldn’t see how the splice was reacting due to the parceling. At about the same line tension as before the windlass relays began to “flutter,” after which it refused to turn any further. Still the splice held. Clearly the addition of the tubing glued tightly to the joint added enough strength to stop the winch. This was good enough for me.

PROFESSIONAL TESTING
Because my crude tests gave me no indication of the actual poundage to break the splice, I decided to find a rope maker who could test one to destruction and also record the breaking point. Miami Cordage is such a rope maker, hidden in the industrial depths of Miami, Florida. Most recreational boaters will not have heard of this wonderful Aladdin’s Cave of rope, because nearly all the company’s product goes to the Navy, the Coast Guard and various industrial outlets. It’s product line includes every conceivable type of rope, from old-style three strand, to a 12-strand Dyneema called “Ironlite.” (The company’s prices are also considerably less than the regular outlets most boaters use!) Jason Hoffman, CEO of the family-owned business, agreed to test one of my splices on some of his government-approved and calibrated equipment. I drove the 220 miles to Miami from my home in Orlando to observe.
I had, of course, read about things like “tensile strength” and “working load” over the years, but none of the complicated mathematical equations applying to these figures actually meant much to me. It’s also easy to become confused by the different manufacturer’s figures, which vary quite a lot for the same type of construction and material. What I did know was that, as mentioned earlier, every time a knot or splice is tied in a rope, the rope inevitably becomes weaker, sometimes by as much as 50 percent. But 50 percent of what? I also knew a rope with a splice in it is much stronger than a rope with a knot.

For the test, I made a splice in one end of a 10ft length of 3/8in double braid, which we attached to both ends of a Miami Cordage “stretching machine.” After the mesh safety doors closed, a steady and even load was applied as I watched the meter reading slowly increase. At 1,000lb I fully expected to hear the loud crack of the rope parting, but it sailed on to 2,000b, and then 2,528lb before the splice finally parted. The tensile strength (breaking strain), of this type of double braided line is around 4,500lb (taking an average of five different makers of the same type of line), and my splice had achieved 55 percent of that. Jason said a professionally built Class 1 splice would normally hold up to 90 percent. However, there can be a lot of variation between a professionally executed eye-splice and one done by a frustrated amateur—like me. An average sailboat owner’s Class 1 eye-splice will apparently often fail at around 60-70 percent, so I was quite happy. A load of a ton or more is also far in excess of anything that might normally be imposed on a 3/8in line on my boat. I received a certificate for the test.
That said, a word of caution: I would not advocate that this type of splice—or any splice for that matter—be used to attach any kind of personal equipment, like when hoisting someone up a mast or attaching a personal tether. The same precaution should also be observed with the reverse-tuck eye-splice, since neither can be inspected under load. An applicable knot is always preferable for personal use. Otherwise, I have no compunction using my splicing method on all of Britannia’s running rigging, none of which have shown the slightest inclination to give way thus far.
Ed Note: To learn more about Miami Cordage, visit miamicordage.com, but beware! You will quickly become mesmerized by the video of the fantastic rope making machine on the company’s home page.
June 2022