
 Photo courtesy of Olga Casey
Everyone dreads the day that something as major and costly as a boat’s rigging must be replaced. For my 1984 Tayana 42, Eclipse, still sporting its original setup and with a 1,500-mile offshore passage looming, the time for an upgrade had finally arrived.
Along with swapping out the old rigging came the issue of addressing another support system. As an old friend had told me, I might as well leave the old rigging on if I wasn’t going to remove, inspect and possibly replace the chainplates.
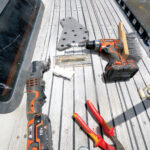
The first step was to gain access to the bolts that secured the chainplates in place. As I did so it quickly became clear that the original equipment had been installed before the construction of the boat’s interior. In fact, the beautiful woodwork that Tayana is known for often gets in the way when trying to expose the structural elements of the boat. In order to precisely remove the necessary joinery without causing unnecessary damage, I therefore used an oscillating cutting tool. Once the chainplates were exposed, a couple of large sockets were used to extract each bolt. In my case, the deck sealant was so dry that the chainplates dropped right out.
Considering that I didn’t know how long it would be before I had the new chainplates installed, it was important to seal the six holes I had just exposed in the deck where the original chainplates had been. For this I used permagum, a sticky waterproof putty that never hardens and easily fills any spaces where you don’t want moisture getting in. Permagum, also known as duct sealant, can be purchased at any home-improvement store.
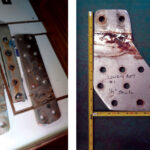
The original stainless chainplates showed their age (left); The old chainplates were sent off to be used as patterns for the new ones (right).
The slots in the deck were filled with epoxy resin and then recut
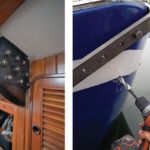
The new titanium chainplates will last the lifetime of the boat (left); The transom was re-glassed and new holes had to be drilled for the chainplate (right).
Heading for the finish line: the author applies sealant to the newly installed chainplates
Given the age of Eclipse’s teak decks, there was a reasonable amount of moisture trapped below, so I also dug out any wet core that exposed itself in the slots where the chainplates stuck through. I then plugged the underside of these slots with permagum and completely filled the void with thickened epoxy. After it cured, I recut the slot for the chainplates with a small hole saw and the oscillating tool. This created an epoxy barrier between the chainplates and any moisture in the deck.
The original stainless steel chainplates did show some pitting and rust stains. However, it’s what one can’t see that is most concerning since stainless steel can fail catastrophically and without warning. This is because in order for stainless to retain its anti-corrosive properties, its surface must be allowed to interact with oxygen to form a protective oxide layer. Unfortunately, the areas of the chainplates that are trapped inside the deck are deprived of oxygen, which can allow microscopic fissures to develop, a condition known as crevice corrosion. If any moisture is introduced, the chainplate can literally corrode from the inside out.
Knowing the pitfalls of stainless steel, I began discussing my concerns with John Franta, owner of Colligo Marine, a leader in custom rigging setups. I’d originally contacted him because I was considering replacing my wire standing rigging with Dynex Dux, after which one discussion led to another. Franta was the first to suggest using titanium.
In addition to being stronger and lighter than stainless, titanium doesn’t suffer from any corrosion issues. That said, Franta did provide one important warning about titanium. Because the tensile strength of titanium is so much higher, there is a temptation to reduce the thickness of the material for cost and weight savings. However, unlike stainless steel, the yield strength of titanium is very close to its tensile strength. This means the load at which the material will start to flex is almost the same as the load required to break it. Considering how dynamic the loads are on a sailboat, Colligo therefore sizes all its titanium chainplates to have the same physical dimensions as the stainless plates they are replacing. This results in a two to three-times increase in the safety factor, with chainplates that are still 40 percent lighter than the original.
After I sent the original equipment to Colligo, Franta created a set of CAD drawings that were then sent to a facility with a CNC water jet cutter. From the cutting shop, the newly machined Grade 5 titanium chainplates were sent to Colligo, where the holes were drilled, any needed bends were shaped into the material, and the edges were chamfered and sandblasted. In order to create the necessary bends, Colligo heated the parts with an acetylene torch. Heating titanium in this manner changes the material properties in various ways that also affect its strength. To compensate for this, the chainplate was subsequently annealed in a kiln at 1,000 degrees F for 10 hours to bring the atomic structure of the metal back to uniformity.
With new hardware, sealant and the helping hands of some good friends, I was ready to install the equipment when it arrived. Even with that, the process was time-consuming and impossible to do alone, as sets of hands were needed on both sides of the bulkhead. Luckily, everything fit perfectly, as the new parts were copied precisely. In the case of my backstay chainplate, I’d also had some fiberglass and gelcoat work done, so I drilled new holes from scratch. When bedding everything I used the same kind of sealant used for the joints in the teak decking, but any sealant which is flexible and resistant to UV rays should work.
The exact cost of replacing chainplates will vary by boat. An upgrade from stainless steel to titanium will increase the cost by 30 to 40 percent. For me, the sense of security my crew and I felt during our aforementioned 1,500-mile offshore journey was priceless.
February 2020


