

Years ago when my wife and I were running sailboats in the Caribbean we once had a guest who, when we’re at anchor, would occasionally look out the big saloon ports at the, ahem, “scenery.” (We spent a lot of time in the French islands back then.) More recently, if this same guest had been aboard our own boat he would’ve quickly given up this hobby for a serious lack of visibility.
The four fixed ports aboard our 51-year-old Allied Seabreeze were virtually opaque, covered with spiderweb cracks and hazed over. Worse yet, they also leaked. At some point, they had been re-bedded, but I couldn’t be certain if the plexiglass had ever been replaced, and the frames and trim rings were also cracked in many places. As is often the case with old boats, I had been contemplating the project for a while and had finally concluded that repairing them was not a viable option. It was time to replace.
After researching options, I decided to have Bomon (bomon.com) out of Canada make a set of replacement ports. They are an experienced manufacturer, making ports and doors for many well-known builders. The ports would be constructed out of extruded aluminum and tempered glass, and I was guaranteed they would not leak. I was instructed to remove the existing ports, make a tracing of the openings, and we’d have new ports in a few weeks. (Ordering in their slower season helped expedite the process.)
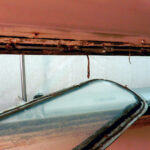
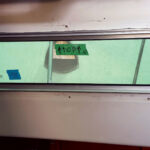
1-Removing the old portlights revealed a mess of caulking
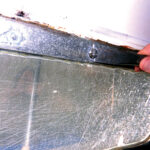
2-Old fastener heads had to be chiseled off
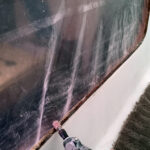
3-The mighty Dremel tool does its work on the rough openings
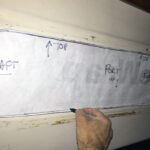
4-The cut-out openings were traced onto Tyvek
5-New portlights had to be dry-fit
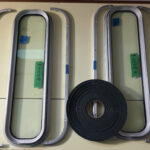
6-Ports and gasket material prepped for installation

7-The gasket material was applied on the flange of the exterior trim ring
8-The top piece of interior trim in place before fastening

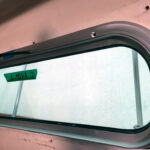
9-New portlights installed… look at that clear view!
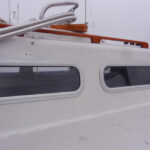
10-Exterior view of the finished portlights
Removing the old ports was the worst part of the project, since all the fasteners were either stripped or fully corroded into the old aluminum frames. Out of a total of 64 fasteners, I could only remove about 10 with just a screwdiver. For the rest, I had to chisel off the old screw head and then use a Dremel to cut a new slot to allow removal. It was a messy, knuckle-busting job, done over a couple of weekends in the cold of a late New England fall, but the promise of a new view of the scenic Maine waters spurred me on. The resulting openings were a little jagged (hand-cutting of any openings was the norm for boatbuilding in the late ‘60s….no CNC machines with clean cuts back then), so I used some West System Six-10 to smooth out the edges in order to get the openings clean enough to make a good set of tracings. For the actual tracings I used some leftover Tyvek from a home project as it provided some rigidity when taped onto the openings. I then mailed my tube of tracings to Bomon, which used them to create a set of CAD drawings that were sent to me for checking against the openings on the boat. As it was, the original openings must have been cut on a Friday or a Monday, perhaps by two different workers, as there were two distinct sizes, one of each to port and starboard. It wasn’t a huge difference, but enough that Bomon cautioned me to place each drawing in the correct opening for accuracy, and when they arrived, mark each port for the correct opening.
A few weeks later a big box arrived with four new ports packed carefully inside. They were beautiful, but since ski season was now in full swing, I set the box aside until April when I could get back aboard the boat and work without freezing to death.
Installing the new ports was a straightforward task. Each came with an exterior trim ring, a split interior trim ring, a roll of adhesive gasket and a set of fasteners sized to the wall thickness of the cabin side. I dry-fitted each one several times, marking for the right opening and top and bottom. After that, I applied the gasket material to the inside of the exterior trim ring, inserted it from the outside and secured it in place with tape. Next, I placed the top half of the interior trim ring over the frame and tightened a couple of screws. Then I put the bottom half in place and tightened all the screws in rotation around the frame, pulling in the gasket for a tight seal.
When the first one was done, I breathed a sigh of relief as everything seemed to fit. Continuing with the other three, the installation was done in a day. With all four in place, I looked out at the clear view of the inside of my canvas cover and in my mind’s eye, replaced the view with an image of a quiet Maine cove during the coming summer. Better still, when we did eventually get on the water, the new ports didn’t leak a drop.
Photos by Andrew Howe
November 2019


")


