My alarm hadn’t gone off yet, but my eyes flashed open. It was the noise: I don’t believe there is a worse sound to hear on the ocean. When I jumped into by bunk, my windvane autopilot was holding course well and the breeze was steady over my starboard beam. Now my boat speed was zero, alright maybe 0.2, and my sails were just flogging in a sea state that had yet to catch up to the breeze. Each wave slammed the genoa into the spreader and rattled anything that could make noise on deck.
I felt the pain for my sails deep down and was on deck dropping the headsail before I even put on any gear. I loaded up the boom preventer and then sat in the shade, scanning the horizon for any sign of breeze. While I wanted to get moving again, I also sought better conditions for my sails. The main I had built myself, and the genoa was a significant investment, both relatively fresh. While I knew nature was fighting me, I still had some control over their life expectancy.
The Basics
In a general sense, damage to our sails is the result of sun, salt, general use, and occasional poor decisions:
UV exposure degrades threads, fabrics, adhesives, and fibers—it’s best to protect sails when not in use, which makes our canvas covers sacrificial.
Salt abrades sails and canvas, so a freshwater rinse is always welcomed.
Chafe is preventable by observing, adjusting, and applying chafe patches where optimal trim leaves no other choice.
Fatigue is experienced any time a sail moves. Flogging sails are among the worst offenders, but each tack takes away life, as does tightly folding and careless reefing. The end of batten pockets are especially susceptible to this degradation.
Loading sails in heavy weather or even for optimal shape places strain on the material. Stretch can be plastic, not elastic, and the shape will not come back fully. Point loading is the primary concern here and can cause sudden damage, like from a spinnaker not having a clean launching and retrieval path.
Over the course of enough miles, we experience the ocean for the tough environment that it is. Perhaps, preparation was slightly lacking, maybe we just got unlucky, or there could have been some sleep deprivation involved, but sail and canvas damage happens.
Material Maintenance
While minor repairs, such as adhering repair tape, can occasionally be performed while sails are flying or a dodger is installed, a lasting repair requires getting the sail or canvas down. Unloading the fabric, or membrane, and working on it in a dry and ergonomic position provide the basis for maximum repair strength and longevity. The approach for completing the repair depends on the material:
• Woven Polyester
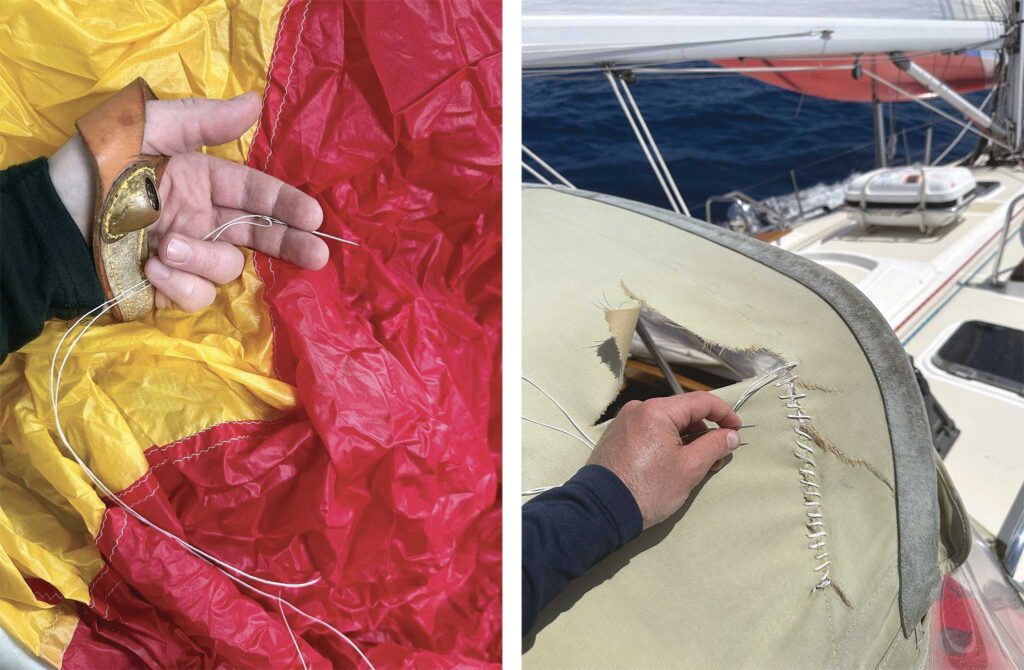
Thousands of stitches join methodically cut panels to create a woven polyester (commonly Dacron) sail. UV and chafe normally strike the integrity of the thread first, while those and other discussed factors slowly break down the durable cloth. Aggressive chafe, improper loading, or impact can lead to sudden damage regardless of age.
Spare sailcloth, webbing, a spool of waxed thread, a needle, an awl, sharp scissors, pliers, and a sailmakers palm can handle most repairs. Basting tape, double-sided and narrow, helps mitigate frustration by holding cloth together prior to stitching. A hot knife is also a welcome addition, but a lighter also works when needed. Some spare hardware, such as hanks and mast slides/cars, is also worthwhile to have onboard.
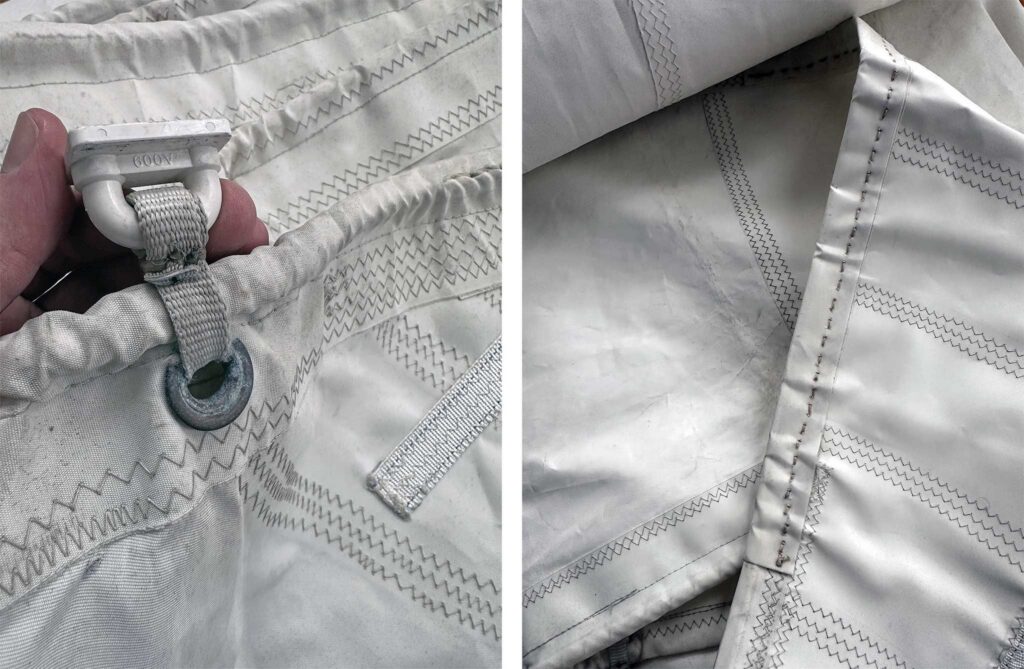
Mainsails and headsails are both loaded the highest along the leech and at the clew and head, plus reefing points. However, loads are still significant at the tack and along the luff and foot, and disperse through the rest of the sail. A small tear in a panel in the middle of a sail can be handled with a patch sewed around it, but a chafed leech requires more care. Reinforcements in a sail, like the leach tape, serve as tips on the loading pattern. Orientation of any repair fabric becomes more relevant in these higher load cases. Match the level of stitching and layers of fabric (tapering to avoid point loads).
Low-load, temporary repairs can be rendered with polyester/dacron repair tape, and should be applied to a dry and clean sail surface. When using this approach, the objective should be to prevent further damage until the sail can be safely repaired properly.
We can only use what you have on board, so having more material opens up more repair possibilities. A local sail loft would be able to assist with spare materials to match an existing set of sails.
If the damage exceeds what can be accomplished with available materials consider if reefing the sail would remove the damaged portion from being in use. In a more desperate situation, fabric could be used from the lower portion of a sail to repair significant damage in an upper section, and the same reefing strategy can be applied. More often, due to the time required for these extensive repairs, swapping sails for the rest of the passage is the best option.
• Composite Sails
The strength of our most advanced sail options is concentrated in the high-tech fibers that are either laminated between films or laid out as filament tapes and cured. Some of these sails are made in panels where others are molded as a seamless product. Repairs for these sails are more limited underway, and potentially at lofts, depending on the level of damage.
If a sail is failing because it has delaminated, there is not much that can be done. Anything applied to the surface is only hiding the symptoms and not solving the underlying adhesion failure. Insignia material (same as used for sail numbers) may temporarily help if it is a localized issue.
For tears and punctures, a surface patch remains the only option for composite sail types. As with any repair, the patch should extend beyond the area of damage. Kevlar adhesive repair fabric offers convenient strength and great chafe resistance. The surface of the sail should be cleaned of salt and grease, using a mild solvent for the final pass. All patches should have the corners rounded prior to application to prevent them from coming off when furled, flaked, or tacked. Sizing the patches differently on each side helps to remove stiff edges and maintains flexibility that keeps the patches secure and the fibers surrounding them less vulnerable. A spray adhesive, if available, also helps—just make sure to shield the rest of the sail and working area. If the damage crosses into a panel seam or onto a sail edge, it can be sewn in place, but the purpose of that is strictly to ensure the patch doesn’t work loose from uneven surfaces.
Laminate sail cloth or special filament tapes can also be adhered (and sewn, if appropriate) for higher load areas. Note that normal epoxy would be too brittle—professional repairs are often completed with a 2-part polyurethane adhesive, but something like Sikaflex 291/292 or 3M 4200/5200 Fast Cure would be a great alternative offshore. Repairs should be completed one side at a time and kept flat with pressure applied while curing. Patching cloths can be acquired from a local sail loft to keep onboard.
• Spinnakers (Nylon)
Spinnakers are subject to the most abuse: whether it be by spreader tip, a wrap around the headstay, or shrimping (being dragged underwater). If that’s not enough, stanchions, hatches, and poles also present the opportunity for tears. And then there’s the mistake of carrying them well beyond their rated wind speed, which can result in an explosion of fabric that renders a spinnaker unrepairable.
Sail repair tape, a nylon fabric backed with an adhesive, works well for temporary repairs of small tears. Making sure the spinnaker is clean and dry yields the best adhesion results. For anything near the corners, along an edge, or for a permanent fix, stick with sewing on a nylon patch, matching the material of the spinnaker, and ideally the color too. Just like woven polyester repairs, match the surrounding fabric and stitching for adequate strength. If a tear is large enough, it may be more practical to just replace an entire panel.
The fabric weight of nylon makes it much easier to stitch than woven polyester, but the flexibility counters that with adding an alignment challenge. Basting tape is very helpful here too for that reason.
• Canvas
Canvas repairs aren’t critical to complete for headway, but equally important for morale onboard. A ripped dodger or bimini can lead to damp or sunburned crew. At the very least, a temporary canvas repair can prevent an issue from getting worse and being unrepairable once back to shore. These types of repairs are in line with those for woven polyester sails. Extra canvas can be carried on board for sewn repairs and interim fixes can be supported with an adhesive cloth.
Often, torn canvas is the result of a high load applied to a UV-degraded fabric, whether it is a crashing wave or a hand looking for a place to grab. Sewing on a larger patch helps to distribute the load of the thread that may otherwise tear through the older fabric with fewer stitches. A second row of stitches can also help further, but ultimately the canvas is due for replacement.

Final Thoughts
Practicing ashore will make sail or canvas repairs easier in a seaway. A small project, like stitching a canvas bucket, builds skills and provides a useful piece of gear. Ask your sail loft for scraps if you want to try working on different materials.
I carry the Sailmaker’s Apprentice by Emiliano Marino onboard. It serves as a reference for more technical repairs and tends to focus on traditional sailmaking and canvas work approaches: which is exactly what is needed when resources are limited onboard or when cruising in far way places. While many of the recommendations can be carried out with a sewing machine, he doesn’t shy away from hand-stitching.
After using his book as a resource for just shy of a couple decades, Emiliano and I crossed paths right before I started the Race to Alaska in 2024. His loft is in Port Townsend, WA, and I stumbled in to pick up some scraps for potential sail repairs, not realizing who he was until we were deeper in conversation. We spent that afternoon together, further preparing Wildcat, my Marshall Sanderling, for the race, and even added to the sail inventory. I finished the 750-mile race with no breakdowns thanks to recognizing that preventative repairs (or replacement) are far easier on shore than underway. It also didn’t hurt being observant while underway. I didn’t need those repair materials that time, but I was grateful to be prepared.
This article was originally published in the April 2026 issue.