

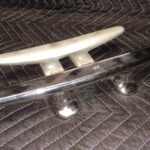
Many production boats come equipped with undersized cleats and poorly designed line chocks. The 10in aluminum cleats that came standard on my Pearson 40 have served satisfactorily for more than 30 years. But as I have outfitted the boat for extended offshore passagemaking, I have upgraded from ⅝in dock lines and anchor rodes to ¾in for an extra margin of safety. I also wanted the ability to secure more than one line on a cleat to give me more mooring and docking flexibility. The original cleats were insufficient to handle two ⅝in lines, let alone the new ¾in docklines. I needed to replace them.
After reviewing the various cleats available, I decided to install Schaefer Marine’s investment-cast 12in stainless cleats. Not only are they much stronger than the aluminum cleats they’re replacing, they would improve the look of my boat. I also decided to replace the standard aluminum chocks with Schaefer’s stainless XCL chocks. Bow chocks, in particular, are subjected to massive loads from anchor rodes or docklines in a rough harbor or during storms.
Installing new cleats and chocks is a relatively simple project, as long as you can get access to the deck space underneath to remove and replace the fasteners. For me, this was relatively easy, although it required emptying some lockers and removing some under-deck trim. With the help of a friend, I was also able to remove the old hardware quickly and begin the replacement process.
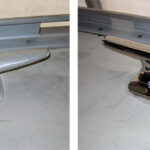
The first step was to fill the old fastener holes. Since the bolt pattern for the old cleats and chocks was different from the new bolt pattern, I needed to plug them with epoxy to prevent water ingress. As a first step, I took a slightly oversized drill and “reamed out” the old holes to remove any residual bedding compound and expose clean deck core material inside the hole. I also countersank the tops and bottoms of the holes to allow the epoxy to spread out. Next, I sealed the bottom of the holes with duct tape before pouring unthickened epoxy into them—unthickened because I want the epoxy to easily penetrate into the core material and fill any voids. I tried to fill the holes to the top without going over the edges. This will permanently seal the hole.
The next step was to determine the cleat placement and drill holes. In most cases, you will simply install the new cleat where the old one were. It is worthwhile to spend some time making sure that the new, larger cleats will not interfere with any other hardware or openings. In my case, the bow cleats are very close to the anchor well, so I needed to make sure the new cleats did not interfere with it either. I also made sure that the dock lines had an unobstructed run from the chocks to the new cleats.
The Schaefer cleats and chocks I chose come with predrilled backing plates. As you are positioning the cleat (or chock), place the backing plate on deck beneath it. Once you’ve found that perfect position, carefully remove the cleat and leave the backing plate sitting on deck. This is now the template for drilling your holes. Using the proper size drill, drill the holes for the new hardware through the backing plate and deck. One trick I sometimes use if I am drilling holes that penetrate into the cabin area is to tape an open plastic bag (old shopping bags work great) under them. This will catch the drill crumbs and prevents fiberglass dust from entering the cabin.
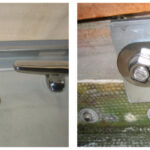
Once the holes are drilled it is time to install the backing plates. Just as the cleats on many boats are too small, so to the backing plates are often woefully inadequate: thus the many tales of bow cleats pulling right out of boats under tow. I always try to use oversized backing plates on any hardware that may be subject to severe loads. This will spread the load across a wide area and reduce the possibility of deck structure failure or leaking.
For my new cleats I chose to fabricate massive ¼in thick, 6in-by-8in aluminum backing plates—probably overkill, but I will never be concerned about the cleats pulling out of the deck. After drilling the holes, dry fit the cleats and chocks with their backing plates to make sure everything fits and that you are able to turn a wrench sufficiently to tighten the nuts. Lightly draw an outline around the cleat or chock with a pencil. This will show where you will need to spread bedding compound during installation. After that remove the cleats and chocks and prepare for final installation.
Cleats and chocks can be installed with any good quality bedding compound. However, I am a fanatic about
preventing leaks on my boat, so every piece of deck hardware on my boat is epoxy-bonded to the deck and I can honestly say that I do not have a single leak from any of those fittings. There is no question that bonding hardware with epoxy takes more time and effort than using traditional bedding compounds. But I think it is worth it to guarantee long-term waterproofing and leak prevention.
The epoxy bonding process starts with a slightly oversized through-deck hole, about 1/16in larger than the fastener. This allows a layer of epoxy to coat both the bolt, where it passes through the deck and the deck material inside the hole. Once the hole has been enlarged, everything must be cleaned with solvent. That includes the deck (top and bottom), the hole, the fasteners, backing plates, cleats and chocks themselves. Any non-oily solvent will do, such as acetone, lacquer thinner or isopropyl alcohol.
For all my solvent/cleaning needs, I like to use Isopropyl alcohol, otherwise known as rubbing alcohol. It is environmentally friendly, works exceptionally well, dries quickly and is completely safe for your skin. Note that for larger projects it can be expensive to use rubbing alcohol purchased at the drug store, so you may want to consider finding an industrial chemical supplier who sells it in one or five-gallon cans.

Once the cleaning is complete, final assembly can begin. Working quickly, I mix a small batch of epoxy and add a high-density adhesive filler like West 404. Do not make the filled epoxy too thick; you want it to flow around the cleat and chock bases and into the through-deck hole. Spread some of the epoxy on the deck inside the previously drawn outline where the cleat or chock will sit. Then spread another layer of epoxy on the section of the bolt that will end up in the hole in the deck.
Insert the fasteners through the hole, add the backing plate and tighten the nuts on the bottom. This should cause the epoxy to ooze out around the base of the cleat or chock. Scoop up the large oozes with a putty knife or mixing stick and then carefully clean up all the visible epoxy on deck and on the cleat or chock using the thinner of your choice. And that is it. Give the epoxy 24 hours to harden (full strength comes after three to five days) and your new cleats and chocks are ready to use,
You now have cleats that are incredibly strong as well as watertight. In my mind, the added safety and flexibility of this upgrade was well worth the effort and expense.
Chip Lawson, a sailmaker based in Dallas, Texas, is preparing his Pearson 40 for bluewater voyaging
October 2016


