

To read part 1, click here.
When I began repairs on my Santana 27, Shirley Rose, I focused on the major systems rather than cosmetics. My goal was to create a safe boat for the often rough conditions on San Francisco Bay, and I didn’t much care about winning any beauty contests. That said, while there were no urgent safety issues in the interior, it did still require a few repairs. Not only that, but as I spent more and more time aboard, I also found myself wishing things were a bit more warm and welcoming.
The interior work actually began while the boat was on the hard. The cabin looked nice with its porthole shades, settee cushions and headliner, but a scent of mold was in the air. I, therefore, recruited two (very good) friends to do something about it, and while I was repairing the hull, they went through every hold and locker to turn out the moldy gear and take stock of what was left. Unfortunately, almost everything cloth was riddled with mold or mildew and had to be tossed into the dumpster.

After that, they set their sights on the headliner. The original headliner was composed of a white vinyl material adhered onto foam, which was glued onto the bare fiberglass underside of the cabintop. This was a quick and easy way to apply the liner, but over time had created a breeding ground for mold. Donning masks, they tore off the vinyl with relative ease. The old foam, though, stayed behind. Using a putty knife, they scraped off the old and brittle foam, which quickly turned to dust. Chunks of foam soon covered everything as a kind of foul, moldy dust floated through the air.
Next, I used a sander with 80-grit paper to remove what was left of the foam, after which the cabintop was mostly exposed fiberglass with just a few stubborn foam strands hanging on. While my friends were still in demolition mode, we also removed the cabin’s old, yellowing wallpaper, which was glued directly to the fiberglass hull. The cabin was left in this disheveled state for some time while I repaired the hull and prepared Shirley Rose for relaunching. With the boat in the water and ready to sail, though, I realized it might be hard to find crew if they were forever having to deal with foam dust floating in their drinks. Time to paint the underside of the cabintrunk!

Having just had to deal with a bunch of mold removal, I wanted cabin surfaces that could be easily sprayed and wiped clean. I, therefore, decided to go with Interlux Brightside exterior polyurethane, a product that’s tough enough to take some serious scrubbing. I bribed a friend with some cold beer to lend a hand, and together we painted the ceiling over the course of a few nights after work. We began by wiping everything down with acetone. This both cleans the fiberglass and helps the paint adhere to the old resin. After the wipe-down, we applied a thin layer of Interlux Pre-Kote to create a smooth base for the paint to stick to. In Shirley Rose’s case, it also helped hide some of the leftover foam strands. After the Pre-Kote was dry, we scratched the primer by hand with 60-grit sandpaper and applied the first coat of Brightside. I wanted a cabintop to match the blue sky, so we combined some White and Largo Blue in equal parts. The first coat looked good, but we went ahead and applied a second coat to ensure there were no missed spots or pinholes. By the end of the week, we had a cabin that was dust-free and ready for sunset cruises on the Bay.

As a side note, repainting the cabintop taught me some valuable lessons about boat work in general: 1) not every project has to be a major overhaul and 2) sometimes completing a small project feels even better than a big one. The larger projects I tackled aboard Shirley Rose served as great milestones, but they could also be a little overwhelming. Completing small projects, on the other hand, is rejuvenating and provides you with a sense of accomplishment that helps build momentum when it comes time to tackle one of the big ones again. This is especially true with painting or varnishing, where things look noticeably better when you’re finished.
Buoyed by this sense of optimism, I created a running list of small projects I could get done in a weekend whenever I needed a mental break from things like rebuilding the mast. It was in this way that slowly, over the course of many weekends and nights after work, the interior was refurbished.
First up on this list was the V-berth. One night after work, I grabbed my respirator and sanded the hull sides and deckhead there with 60-grit paper. I’ve spent countless days sanding hulls as part of my job at the boatyard, so the V-berth of a 27ft boat went quickly. (Because the V-berth didn’t have a foam headliner, no scraping was involved.) When the sanding was done, I wiped everything down with acetone and primed with Pre-Kote. After that came two coats of white Brightside, applied using a 4in foam roller. Just like that, the V-berth looked good as new.
While this was going on, a friend came down to help me varnish the cabin bulkheads. Full disclosure: I’m a fiberglasser and well aware of the fact my varnishing skills are a little “utilitarian,” so to speak. I went with Epiphanes Clear High Gloss varnish because, as with the Brightside, I figured if it’s tough enough for exterior use it would be more than adequate for sprucing up the cabin. The directions on the container said to apply two or three coats of varnish with 24 hours dry time between them. However, I only went with a single coat of varnish, because I was simply looking to add a cosmetic shiny coat rather than true protection. I also thinned the varnish less than what the directions recommended in the interest of speed.

We used a variable-speed sander with 100-grit paper to prep the bulkheads and the backrest of the settee, which was also looking pretty rough. It was a large area to practice on, but I had faith in our abilities. After a quick cleaning, we mixed up the varnish and went to work with a pair of 3in paintbrushes on the bulkheads. These were cheap and did the job well. However, we also had to keep an eye out for the stray bristles they kept leaving behind. Similar to spotting bubbles in epoxy, when working with varnish it helps to look at the working surface from various angles to spot any imperfections. Although our-down and-dirty approach left a few drips, I was happy with the overall result.
Next up came the weekend I set out to varnish the entire galley plus the vertical surfaces of the settees. On Saturday, I sanded the entire area with 120-grit sandpaper, wiped it with down, taped off the surrounding areas and varnished. On Sunday, I hand-sanded the area with 200-grit paper and applied a second coat. By now it had been a few months since we’d varnished the bulkheads, and I told myself I’d go slower this time. In the end, I think I did a pretty good job, though I still left a few drips. It was nothing less than amazing how much a couple of coats of varnish seemed to bring things back to life—though my eye still catches those drips every time I’m hanging out below!
At this point, the only remaining part of the interior that needed varnishing was the head and storage locker. Before I could start sanding, though, I had to repair the top of the locker, which was now moldy and delaminating. Although I managed to remove and save the original teak pinrail, there remains a small gap between the edges of the new shelf I built and bulkheads. I’m sure the gap is one of those details no one else will ever notice besides me. However, I could see adding a bit of gap-covering trim if or when I ever feel motivated to do so.
The hardest part was trying to find the necessary marine-grade plywood. I didn’t want to buy a large sheet for such a small job, but couldn’t find any small scraps that fit the bill, either. I ended up using some standard, shoreside high-grade plywood, not marine-grade, which I sealed with a couple of coats of varnish. Did I take the easy and less durable path? Probably, but it’s not a structural part, it saved me some money, and it will be really easy to replace if necessary. Although I used varnish alone to seal the plywood, I now wish I’d used a marine sealer with stain, so that it would blend in better with the other, older joinerywork around it. Now I know. I chose not to immediately put the pinrail back on, because I thought it would be easier to varnish on the galley table. After it was done, I nailed the rail back in place. Everything looked great.
Meanwhile, though my varnishing skills may have still been a work in progress, my prep skills remained rock-solid, and I had the head and rest of the locker sanded and taped off after just two nights of work. This included sanding every small decorative bevel and taping every hinge. It’s a narrow area, but thankfully, there’s no door on the head, and once I got started I was able to varnish the entire area, including both bulkheads in one fell swoop. It would have been easier to varnish half the area and then leave the other half for another day. But, again, speed was my goal. Trying not to bump into all that wet varnish as I was moving around was a fun challenge, and what’s the point if you’re not having a little fun?
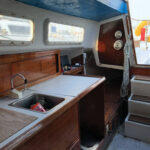
A fresh coat of varnish did wonders for Shirley Rose’s interior brightwork
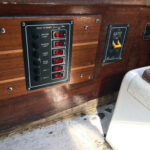
The original electrical panel was a refreshingly simple one
Nonetheless, the author needed professional help to ensure it was rewired correctly and safely
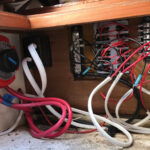
Finally, in between varnishing sessions, I decided to replace the electrical system, another task full of fun and learning. Among other things, I knew I would need to replace the rat’s nest of twisted and capped wires behind the circuit-breaker panel, for safety’s sake as much as anything else. Knowing next to nothing about electrical work, I read as much as I could and relied heavily on the experience and professional knowledge of my coworkers. To start out I drew an electrical schematic diagram of the entire boat, which a colleague used to order the correct replacement parts. I felt pretty confident replacing those older parts that needed to be replaced with new identical ones, like the battery isolator switch. However, I depended on one of the ABYC electricians at work to ensure the other, more challenging installs were all done correctly. Electrical work is complicated and far too easy to screw up for me to have safely tackled this part of the job by myself. This was made abundantly clear when I asked Ed, my electrician friend, to help me install the replacement panel. I thought I had a solid understanding of the job ahead, but one look at the rat’s nest, and he realized there was more to the job than I had expected.
First, we focused on the AC 120V system. The original main breaker was still in good shape, so Ed simply replaced the wiring. The old duplex outlet, however, while functional, could not be reused because it didn’t have a ground fault circuit interrupter, or GFCI, an outlet that breaks the current if it senses a problem. I bought a new outlet at the chandlery, and Ed installed it with ease. After that, we replaced the cockpit’s shore power hardware. Inexplicably, the old unit had wires running through an oversized hole into the cockpit, which not only exposed the wiring to the weather, but allowed water to seep in. I used some Dyna-Glass to fill and fair the hole, and Ed installed the new inlet. Although this was a simple enough process for Ed, I was amazed at its complexity. With the AC system done, we moved our attention to the 12V DC part of the boat.
Compared to the AC side, the DC side of Shirley Rose’s electrical system is fairly straightforward, with no complicated electronics like a depthsounder or speed gauges, just a chartplotter, and steaming, running and cabin lights operating off the system. Ed and I began by replacing all the wiring to make sure everything was corrosion-free. Ed demonstrated how to properly connect and run a few wires, after which I felt confident enough to do the last few lights on my own. That done we set about connecting the new panel to the batteries. First, I mounted the new panel with a pair of bus bars on a custom teak mounting plate, which except for the rebuilt mast, is now arguably the nicest piece of equipment on the boat. Ed was happy with the layout of the panel and bus bars but puzzled by the breakers. Eventually, after looking at the specs online, he realized the previous owner had attached the negative wires incorrectly—confirming yet again why enlisting the help of a professional makes sense when it comes to this kind of work. Finally, we finished things up by replacing the thick cables connecting the house and starter battery to the rest of the system. With that job done, Ed took off and I cleaned up all the stray wire clippings we’d created and called it a day.
Rewiring the rest of the boat was fairly standard, with the exception of the masthead and steaming lights. While rebuilding the mast, I’d talked to one of the boatyard riggers about creating a quick disconnect at its base so I wouldn’t have to cut the wires if or when I ever wanted to lower the mast in the future. He said he had heard of people using car trailer light connectors, but those seemed likely to corrode. In the end, I connected the mast wires to the panel using a terminal block mounted on the cabintop. Now, I can disconnect the mast lights using a screwdriver.
By now Shirley Rose was looking fresher and working better than she had in ages. Conquering the electrical system had been a confusing task, but part of the appeal of working on boats is the fact it’s so challenging. In hindsight, I would have done some things differently, but I’m glad to have had the opportunity to learn by trial and error. To this day, I still love seeing the orange glow of the switch after I flick on the lights. Though boat work can be overwhelming at times, I keep plugging away and enjoying the small victories.
Photo by Greg MacIver
October/November 2021


")

")


