

Ever since the advent of GPS, I have not found much use for the chart table on my schooner Britannia. Most of our passagemaking navigation is done on a Raymarine multifunction display on the helm pod, which is then transferred to a paper chart on the saloon table roughly every hour. The chart table is only used to store things that didn’t have a permanent home and as a desk for my laptop.
Considering the chart table and its attendant seat took up over 40 percent of the length of the port-side saloon, it was not a very efficient utilization of space. The basic layout also left a lot to be desired. The area between the table and companionway ladder was a narrow 10in, and squeezing into the seat frequently resulted in accidentally tripping breakers on the master power distribution panel, which had been placed at the side of the table. The half bulkhead it was attached to also impeded sliding in and out of the seats when the saloon table was up. It had to go!
I’m a traditionalist—I wouldn’t sail a square-rigged schooner if I wasn’t. However, advancements in equipment, especially the latest electronic nav aids, should cause us to rethink some of the more traditional methods and layouts—like chart tables. Our trusty sextant served us well on past ocean passages but now hangs in its teak box on the saloon wall, an enchanting relic of days gone by.
I thought about extending the saloon seating into the corner where it would have made a lovely snug spot in a seaway. However, not having a chart table at all might be a mark against the boat if I eventually decide to sell. I needed something, just not the bulky monstrosity the boat came with.

Eventually, I hit on a compromise in a nearby antique mall: a beautiful secretary’s desk with a hinged, drop-down lid, a wealth of drawers and compartments inside and four large drawers below. With the lid open it is nearly the same size as the chart table and would easily fit in the existing space. Unfortunately, it was stained a horrible brown/black color, and I wasn’t quite sure what type of wood it was made of. But I decided to take a chance and bought it for $214. A major limiting factor was the size of the companionway, which the desk had to pass through. It had a maximum diagonal opening of 32in. The desk measured 31in. Made it! After that came removing the original chart table and seat, a process that was complicated by the presence of Britannia’s master AC/DC power distribution panel.
Stonehenge be gone!
The original chart table and seat were built 9in higher than the rest of the saloon sole, presumably, so anyone sitting there could look out the windows. I knew dismantling it was going to be a tough job. In places, the molding was a sandwich of ¾in marine plywood plus two layers of fiberglass, all heavily bonded to the side of the hull. I christened it “Stonehenge” because the manufacturer clearly never meant for it to be removed or altered in any way! It certainly was well made. A pity it was so big and unergonomic. I think even the Druids who built the actual Stonehenge could have done better!
Before dismantling the edifice, everything I could remove from the saloon and galley was taken, and those things that could not be removed were covered with cloths. I knew what was about to happen.
Unscrewing the teak chart table was easy enough, but it was so heavy two people were needed to lift it out of the boat. Otherwise, so far so good. The instruments I’d had installed also came out easily enough, as did the two small drawers, the cupboard and all the teak fiddles.
After that, I set about sawing the fiberglass support structure into small enough pieces to pass through the companionway. I used a circular saw, a reciprocating saw and oscillating cutter—plus a big hammer and pry bar! It was hard going, with fiberglass dust all over the place. I tried to keep the dust down by positioning a shop-vac nozzle near the cutting edges of the saws. Including the chart table, I ended up removing about 200lb of material in all!
Next, I attacked the half bulkhead, which no longer needed to be so high. This was composed of a pair ¾in plywood bulkheads set side-by-side with fiberglass in between. I began by cutting out the inner bulkhead and then carefully removing the teak edging. I then reshaped the panels and refitted the trim to form an armrest. As I was doing so I needed to keep the boat’s electrics running, particularly the air conditioning, which meant being very careful around the wires. I found myself having to soak my aching back in Britannia’s hot tub every evening.
Unfortunately, the builders had not extended the teak and holly cabin sole under the chart table, as they had on other parts of the boat. All the boat had there was raw plywood under which ran the conglomeration of wires leading to the electrical panel. I, therefore, cut the floor out completely and after rerouting the wires made a new floor out of ¾in plywood, including a hatch to give easy access to the three sea-cocks and filters below as I did so. I also relocated the dedicated engine start battery under the new floor. Finally, with Stonehenge fully excavated, I had a large open space to play with.
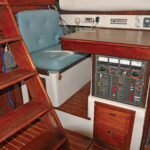
The nav station was fraught with hazards: note the tight squeeze between the table and companionway and the exposed location of the breaker panel
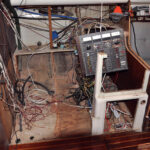
The nav area mid-demotion, with the partial bulkhead (at right) cut down
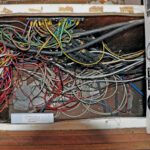
A look behind the panel pre-rehab. Heavens!
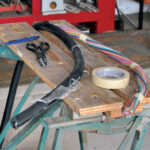
A portion of the new cabling before installation
Electrical Installation
The first thing to relocate was the breaker panel, a spaghetti-like maze of wires, buzz-bars, connectors and relays, some original (circa 1977), some installed over that years as I added new equipment—it was truly an electrical nightmare that had needed sorting out for a long time. Of course, rewiring the panel, with its hodgepodge of wires could easily turn into an even worse nightmare if I got wires muddled up, so I needed to be careful. It’s at moments like this my wife always reminds me of that timeless mariner’s adage: “If it ain’t broke, it will be when I fix it.” (Actually, what I really need is to have it tattooed on my right arm, so I can be sure I’ll be reminded of it before starting complicated projects like this one!)
I planned to reposition the panel higher up, where the breakers could no longer be accidentally tripped by passers-by. I, therefore, built a teak framework under the curve of the deck and then modified a spare louvered door to provide access to the wires leading to the panel above. I also fitted a piece of ½in plywood underneath the panel to hold a set of four generator and water tanks gages.
There are different ways to re-wire an old boat. You can buy individual lengths of wire or you can convert to a NMEA (National Marine Electronics Association) networking system, which interconnects nearly everything and can be read on a multifunction display screen, including engine instruments. You can also convert to Wi-Fi and go pretty much completely wireless. However, the latter two options were well outside my budget for this project, leaving me no choice but to go old school.
I decided to use regular wire, but instead of buying individual lengths I bought a 20ft length of multi-conductor cable containing 20 wires of 14 AWG (American wire gauge). The wires are all different colors and very much cheaper than buying individual wires. However, a problem can occur when using multi-conductor covered wire—individual wires can become hot, even with just 12 volts. Therefore, the first thing I did was to completely strip off the outer rubber casing, using a box cutter and pull the wire loom out. This separated the wires and made them less susceptible to overheating. I could also easily pull a few strands out of the cluster, which went to places other than the electrical master panel.

After that I drilled a hole in the cockpit sole and wound the cluster of wires all the way to the back of the electrical panel, supporting them as necessary. I then enclosed all the wires coming out of the pod in a nice plastic split wire casing to keep them tidy down the side of the pedestal. That done, I disconnected the AC shore input and hung the distribution panel from a hook in the ceiling beams so I could easily work on the back. For temporary lighting and power, I used an extension cord direct from the marina dock.
As each wire was replaced, I switched the power back on to check if the equipment still worked. It was a slow, tedious and, at times, quite a strenuous process—reaching behind panels and pulling the old wires out. I also went through an awful lot of crimp connectors. On the 120 volt AC side, the heavy-duty cables leading from the two ship/shore power plugs were long enough to reach the repositioned panel and thankfully did not need extending, just sorting out from the hopeless tangle in which they had been installed.
It took four weeks in all to completely re-wire the panel and then fix it to the framework I had built next to where the new desk was to fit. In the end I was actually quite amazed everything still worked as before. For once I proved the old adage wrong!

Refinishing the Desk
During breaks between all this dismantling and re-wiring, I’d also found time to renovate the bureau desk in my garage. The moment I put my sander to it I knew I had a gem—it was real wood with a beautiful walnut veneer! Strip away the stain, cleaning the veneer and then revarnishing with Total Boat wood varnish from Jamestown distributors was a pleasure. I even found a set of ornate brass drawer handles online to replace the horribly painted handles it came with. (The new handles were only $2 each and look superb!)
In order to be able to fit my laptop into the desk, I removed the vertical dividers that were there and mounted the five small drawers a little closer to the top. With the flap open, the table is about the same size as the original. When closed, though, it takes up less than half the space.
I was hoping with all my might that my companionway measurements were accurate as my wife and I carefully manhandled the posh new desk down the deck and into the cockpit, trying not to scratch the newly varnished sides. On its side it slid through the opening with about a ½in to spare. Whew! After that, it was no trouble at all sliding it sideways under the curve of the deck, where I in-filled between its ornate feet with a plywood plinth to keep things from rolling underneath it.
I already had a comfortable folding deck chair that fits perfectly alongside my new desk and can be used at the dining table when needed. As an added touch, I bought an antique-looking 16th-century globe drinks holder, which fits in nicely alongside my new workstation and it held in place by a pair of teak collars in the floor.
My new nav station is now considerably more comfortable to sit at the desk, and the saloon appears very much bigger with Stonehenge gone. The electrical panel is also easier to operate and accidentally tripped breakers have become a thing of the past. The remodeled area is now more akin to a neat little office than a boat’s navigation area. Smaller boats than Britannia might greatly increase living space by redesigning their chart table area. All it takes is a little “out-of-the-square” thinking.
Photos by Roger Hughes
July 2021


