

Our 1987 Pearson project boat came with an elderly but functioning Raymarine chartplotter, located belowdecks at the nav station. Since I usually sail solo or doublehanded, it was of little use down there—it needed to be near the helm. When I decided to update the plotter along with all the other vintage electronics, I had little choice but to mount it on the steering pedestal.
Most modern helm stations have molded pedestals with room for MFDs and instruments, but that wasn’t the case in 1987. The 32-year-old Edson pedestal gave me two options. I could replace the pedestal guard with a much higher one that would allow me to position the new MFD right in front of the wheel, or I could opt to have it mounted lower on one side of the guard.

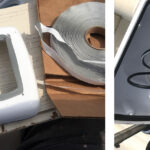
Pic 7: After ensuring the cables would both fit through the hole I drilled under the pedestal guard leg, I enlarged both it and the screw holes, filled the voids with epoxy to keep water from migrating into the balsa core, and then re-drilled them. Pic 8: The middle screw stops the mounting arm from moving, the other bolts lock it in place. The Torx driver was part of the mounting kit. I had to remove the compass binnacle in order to tighten the bolts.
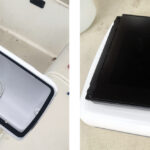
Pic 9: With the arm mounted I’m ready to install the display, leaving plenty of cable inside the box to allow for movement. Pic 10: At this point I did what I should have done first—check that Navpod had supplied the correct cutout for the Raymarine display! It was a tight fit, but that’s a good thing.
Pic 11: Time to install the display—first step is a layer of butyl tape to seal it against the elements. Navpod will supply a gasket if the plotter maker hasn’t included one, but I forgot to ask them for it. Although the Navpod itself is well waterproofed, this is where water might get in, and the makers recommend you drill a small hole in the bottom to let it out. Pic 12: All is good. The display has been screwed in place, the cables connected, and all that remains is to bolt the two halves of the box together with Navpod’s “tamper-proof” screws. Oh, and in my case, do the drill-and-epoxy program with the holes in the cockpit sole before connecting the cables belowdeck. Otherwise, it’s beer o’clock.
I dislike having to peer over or around a glowing screen—there’s nothing like it to ruin your night vision—and nor do I like having to stand behind the wheel in order to see the display. I wanted to be able to turn the MFD so I could sit beside or forward of the wheel, instead of being trapped behind it. After checking out the offerings from the various makers of instrument housings, I chose one of Navpod’s Railmount swiveling waterproof housings, which mount on a stainless steel arm that bolts to the pedestal guard. You can order these housings as blanks and cut out the hole yourself, or you can do what I did: specify the MFD model—in my case a Raymarine Es75—and Navpod will send you the housing with the right-sized cutout.
Installation involved drilling holes in the pedestal guard, which would need to be unbolted from the cockpit floor in order to pass the new cables into the boat. The cables also needed to be connected—the Raymarine eS7’s Seatalk NG data cable had to be hooked up to the system backbone, and the power cable had to be connected to a circuit breaker in the 12V distribution panel. All in all, you can count on a pleasant, leisurely day’s work for this nice, clean project, with frequent breaks to admire your progress. The only hiccup for me was waiting for the epoxy to cure after I had over-drilled and filled the holes in the cockpit sole, which I should have done in advance.
After unpacking the box, I got right to work.
Photos by Peter Nielsen
September 2019


