

Don’t take your rig for granted. Show it some love before you start the season During spring commissioning we often lavish far more attention on our engine and electrics than we do on the rig, even though the latter presents a much greater risk to both the boat and crew. Because standing rigging has so many possible weak points, it’s virtually impossible to work out when any part is about to fail. Therefore, a close inspection should be a mandatory element of your pre-season preps and checks.
It will rarely take more than a couple of hours to complete a detailed rig check, and in doing so there are a number of telltale signs you should look for. While you’re at it, there are several maintenance tasks you can carry out to prolong the life of your shrouds, spar and fittings.
When you’re inspecting your rig, be sure to take an inventory of all the parts and their dimensions, and photograph them. This will help should you ever have rig trouble far from home.
Every few years, you should also unstep the mast to check it over thoroughly at ground level. This makes close inspection of areas like the spreader roots, mast terminals and halyard sheaves much easier.

Spar Check
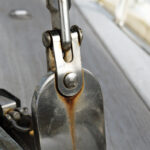
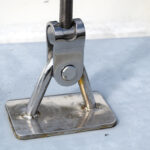
Start rig checks by inspecting the spars, commencing with the mast step and foot. The high compression forces on the mast step can put severe strain on both the T-bar and step, particularly if there is any imbalance in the rig tension. It’s also an area where saltwater can gather in a pool, making it prone to corrosion. Look closely at any rivets around the base and at the mast section for signs of corrosion or cracks.
The gooseneck is a common weak spot on any rig because it has to withstand massive forces in several different directions when you are under sail. Failure can cause considerable damage, especially if it tears itself out of the mast, which will then be severely weakened. I always remove the main pivot bolt. Though it might look OK from the outside, saltwater often drips into and settles inside the guide holes, seriously corroding the bolt just where you can’t see it.
As with all the other mast fixtures, check closely for hairline cracks around the gooseneck fitting—either on the mast or on the fitting itself. This is best done using a dye, which will help make cracks more visible to the naked eye.
The vang fittings are also notoriously weak points on the boom. As these suffer similar stress levels underway, it’s wise to give them the same close inspection as the gooseneck.
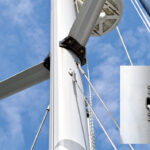
At the masthead
Once you’ve done all you can at deck level it’s time to go up the mast, so dig out the bosun’s chair and find a trusted buddy to help. Most masts have integral sheaves that rarely get checked during the season. Remove their axle pins and sheaves to check for bearing wear and any flat spots that might indicate a previous seizure. On reassembly, replace any retaining pins/rings and ensure the sheaves spin freely.
The same goes for external halyard blocks, although you’ll also need to ensure their swivels are rotating freely. Remove shackles, check for wear or distortion, then clean, lubricate and refasten. Mouse the shackle pins with new Monel wire, making sure there are no sharp wire ends to catch the lines or sails.
Next, check the mast fittings where the backstay and forestay connect, ensuring clevis pins are straight and secure. Inspect the area around tang plates and toggle fittings for cracks—these can be microscopic, so use a magnifying glass and dye.
Another common area of rig failure is where the shrouds are secured to the mast. Various connection methods are used, but all should be checked closely for wear, corrosion and cracking. Any sign of wear on T-ball joints (often the indication of an under-tensioned or misaligned rig) means the terminal, socket or both should be replaced. Also look to see if there is any rust or broken wires where the shroud enters the terminal. This will be more obvious if you slacken the tension off the wire and then wiggle the wire about a little.
As you work your way down the mast, check that the mainsail track is clean, straight and well secured, giving it a spray of track lubricant as you descend. Inspect the spreader roots and ends for corrosion or damage, particularly if they have plastic end caps. Also, check to make sure the spreaders aren’t bent or distorted.
Turnbuckles and chainplates

Back at deck level, the turnbuckles and chainplates must be closely inspected for cracks, rust, wear or distortion. Worn toggles and clevis pins should be replaced, as should any old split pins/rings. Clean the threads and grease them lightly with Lanocote or Tef-Gel. If the turnbuckles have been tightly taped up, there’s a chance that oxygen restriction will have caused corrosion, so remove these and check for any discoloration.
Next, look up the rig to make sure all the shrouds and stays lead fairly from their mast connections to the turnbuckles and make sure the turnbuckles are all equipped with toggles. Finally, check the chainplates closely for any signs of cracking or distortion. Also, feel and tap around the plate to ensure the deck has not absorbed water and delaminated as a result of poor or dried-up seals.
Retuning the rig
When you’re happy that everything is good, it’s time to retune your rig. If you do it yourself, you should start at the bottom, working your way up from the lowers to the cap shrouds and finally to the stays. Keep the balance equal on each side by counting the turns on each turnbuckle. Do a few turns on one side before going to the other and applying an equal number on the opposite shroud. This way you won’t risk deforming the mast or pulling a fitting out of line.

Rig Checklist
Check out:
- Mast and boom for cracks and corrosion
- Spreader roots and ends for damage
- Integral masthead and boom sheaves for seizures and flat spots
- Corroded or broken shroud wires
- Cracked, seized or rusty turnbuckles
- Toggles for wear and distortion
- Alignment of shroud fittings
- Furler and swivel bearings for wear and lubrication
- All shackles for wear and distortion; replace mouse wire
- Backstay insulator for cracks
Sailing writer Duncan Kent has never yet lost a rig
May 2017


")


