
 Photo by Adam Cort
Properly maintaining your inflatable boat can be vexing, no? Wait a sec, though, before throwing up your hands and marching off in search of a bottle of rum. As the owner (and chief repair technician) of two inflatable-boat repair companies, let me provide a few pointers.
In the Know
Before you can even begin to diagnose an issue or determine what kind of work your inflatable may require, you need to know what you have. First and foremost, you need to be aware there are two types of fabric out there: Hypalon (CSM) and PVC. Each is constructed differently and therefore must be treated differently in terms of maintenance and repairs.
Often, the brand you have will help you solve this quandary right off the bat. For example, Avon, AB, Achilles, Caribe, Highfield and Walker Bay are typically Hypalon vessels. Unfortunately, the waters become a tad murkier when it comes to West Marine and Zodiac, since these companies manufacture boats made out of both. If the data plate on your inflatable is intact, consult it to find your model number. A speedy internet search will deliver the specs and material type.
As is the case with so many things maritime, performing periodic inspections of your dinghy will alert you to minor issues before they become major problems. Look for detached fabric or accessories. Feel the tubes to get an idea what kind of shape they’re in. If they are dry or riddled with cracks (“alligatoring”), you don’t necessarily need to trade your dinghy in for a new one, but you will need to step up your game in terms of a UV protection.
 Photos by Zoey Zaleta
Regardless of the state of your tubes or material type, you’ll also need the following:
• a spray bottle filled with water
• Palmolive dishwashing liquid (yes, it’s from the 1970s, but it works the best for our purposes)
• a foot or hand pump
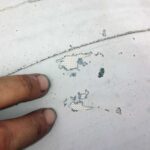
This worn tube section needs to be dealt with
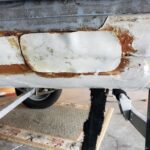
The fabric has begun peeling away from the transom on this boat
To begin your inspection, add some Palmolive to your spray bottle, pump the boat to spec pressure from aft to forward (drum tight) and start spraying. Setting your spray nozzle so that it produces a wide mist rather than a narrow jet will be more efficient. Either way, be sure to fully soak the tubes. The goal here is to look for any air bubbles that might be appearing, a sure sign of leaks.
Pay close attention to seams, cones and valves. Leaks are rarely cooperative enough to appear on an open field of tube. Nah, they’d rather sit right the heck next to or even behind some kind of label or fitting.
No leaks? Fantastic! But you’re not finished yet. Look for worn fabric, especially on the top of the tubes. These worn areas will eventually dry out, at which point they’ll start to leak. Check around all accessories and attachments for wear. As the tubes deflate in cooler weather, some accessories will sag and cause chafing of the tube fabric. Don’t forget to examine the transom holders. You certainly don’t want any kind of detachment there!
Have you always dreamed of being a contortionist? Now’s your time to shine! The bottom of the boat doesn’t want to be ignored, so get under there to check for wear, including under the transom and around strips attaching it to the boat’s tubes. While you’re at it, grab at the tube-to-hull strips themselves to ensure there’s no detached fabric. If you have a wood transom, be sure to keep a sharp eye out for rot.
The last leg of this journey is an inspection of the valves. Are the caps all there? Do the “plungers” move freely? While you’re poking around, it’s perfectly fine to spray a bit more of your Palmolive mixture in there to clean out any sand or other debris that may have begun to accumulate.
In addition to regular inspections, you’ll also be doing yourself a big favor by applying a UV treatment to your tubes once a month. I recommend 303 Aerospace Protectant. There are a ton of products on the market, but this one is affordable, easy to find in stores or online and works like a charm. It would also be a stellar idea to clean the boat on a regular basis. You can use your trusty Palmolive and a green scrubby pad for the first round. If your day and dinghy aren’t brightened enough by the results, a purpose-built inflatable boat cleaner can help you get the desired “squeaky clean visage.”
Words can hardly begin to describe this scandalous DIY patch job…
Don’t be this dinghy owner! While 5200 is great stuff, it should never be used on an inflatable
Whatever you Do, Don’t
Moving on to the question of repairs, it’s important to be aware there are a plethora of products out there that are not meant to be used on your tubes. I can’t tell you how many times I’ve had to pronounce a boat “DOA” due to a customer having slathered one (or more) of these on their dinghy.
One of the worst is 3M’s 5200, the scourge of my existence! It’s fine for through-hull fittings, but it’ll ruin your tubes. I wish I could invite all of you to my shop for the interminably long shifts I have had to endure in order to remove that mess without damaging the fabric.
Next on the list is silicone. This reason for this is that while I can remove the visible portion, I can’t remove all traces of it. These same traces will then seep deep down into your fabric making it impossible for patches, accessories or anything else to adhere to those areas ever again. Many of you want clean, shiny dinghies. But please avoid using Armor All to get them looking that way. It’s silicone-based.
Flex Seal is another bad idea. On the one hand, it isn’t gonna seal those leaks. On the other, it’s a royal pain to remove, as it often flakes off in minuscule pieces. And don’t even think of using roofing tar or house paint. (It’s been done!)
In addition to these “no-no” products, there are a number of practices you’d do well to avoid. For example, it is never a good idea to leave an inflatable pumped up to spec pressure in the hot sun. This is especially true with glued-seam PVC boats, since you’ll stress the seams, which can cause leaks (or worse).
Conversely, buzzing around when the tubes are not inflated to spec pressure is a sure way to destroy those handy dandy transom holders. The reason for this is that the outboard creates vibration, and if the tubes aren’t pushing firmly against the sides of the transom, they’ll begin to pull away from it. Imagine what an unpleasant feeling it would be to watch your tubes float away from you!
Strange as it may sound, your inflatable actually likes being inflated. Oarlocks and grab handles are rather heavy accessories. When your tubes are deflated, the uneven loads on these items can be too much for good adhesion to bear. The same goes for rubrails. Try to give them a nice firm, wide surface to cling to.
 Photo by Zoey Zaleta
Beware of Self-sufficiency
At this point, I’m hoping you’re starting to feel pretty good about your dinghy maintenance. There comes a waypoint, though, where even the most self-reliant sailor should turn things over to a professional, and that it in the area of repairs. The reason for this is that as a professional repair technician, I have a set of hard and fast rules I always follow (despite being the “Queen of the Nonconformists”) to ensure my work comes out as it should. Failure to follow any of them is asking for trouble, and following them, no matter what you might think, can be a lot tougher than it sounds.
A climate-controlled environment, for example, is a must. If you’re trying to patch a leak while the dinghy is aboard the mother ship at the marina and the humidity is sky-high, your attempt will fail—simple as that.
If you’re trying to put a Hypalon patch on a PVC boat, or a PVC patch on a Hypalon boat, your attempt will fail.
If you’re using an adhesive that’s beyond its shelf life, your attempt will fail.
If you don’t perform the entire prep phase correctly, your attempt will fail.
The list goes on.
I understand many of you think it will be beyond your budget to get your dinghy fixed at a repair shop. You, therefore, decide to give it a whirl. The reality, though, is that the cost of a DIY will often end up far exceeding what I’d charge to do the work for you. You’ll need protective equipment, brushes, cloths, fabric, chemicals, adhesive, possibly sandpaper, maybe a heat gun, just for starters. Why put yourself through the aggravation? Why chance destroying your “taxi” for the sake of saving a little cash? I’m sure you have plenty of other projects you could be taking on, so whatever you do, don’t DIY it! Of course, there are those cruisers who will occasionally have no choice but to attempt a DIY job when they find themselves in locales that don’t offer repair facilities. I understand that, but only as a last resort.
 Photo by Zoey Zaleta
Finding the Right Shop
Another cause of DIY disasters is repair shops that put out shoddy work. I can’t blame you for being jaded if you’ve ever shelled out for repairs that didn’t hold. One burned, twice shy. A little research and common sense, though, should be sufficient to find a place that knows what it’s doing.
To start out, do a simple Google search for “inflatable boat repair.” When studying the company website, try to get a sense of what type of operation you’ll be encountering. Large shops will most likely have a good supply of parts and accessories in stock, but turnaround times may be long and prices may high. In addition, when volume is the top priority, quality and attention to detail may fall by the wayside. In my experience, mom-and-pop shops generally provide the best service, though there may be a little extra lag time in the event parts need to be ordered.
Of course, there are also any number “fly-by-nighters” out there who think they can hang out a shingle because they’ve watched a YouTube video full of misinformation. “Before” and “after” photos will give you a good idea of the types of repairs such a facility is capable of performing.
Social media is another good source of intel. Facebook, in particular, is a fantastic platform for shop owners, as it allows them to showcase their “masterpieces,” as well as let you to connect with past, present and future customers. Check out any posted photos or videos. Also, take a peek at the comments section to see what types of interactions your potential techs have had with others who’ve contacted them. Facebook boating groups are a resource, as well.
Finally, there’s always good old-fashioned word of mouth. Ask for recommendations from friends and marina neighbors. Sailors everywhere will chime in to direct you to—or away from—certain companies. You can also try calling your local chandlery or West Marine to find out who they recommend.
Once you’ve decided on a repair shop, be sure to ask the tech there about his or her processes and policies. Slapping patches over seam leaks does not constitute a proper repair. Your technician should be able to describe an entire plan of attack, based on his or her own inspection. They should listen to and address your complaint(s), but also be able to spot any concerns or issues you may have missed. If your dinghy is beyond the point where it makes sense economically to repair, your tech should tell you that as well (as opposed to charging you to fix something that isn’t worth saving).
Pricing will vary depending on geographic location, size of the company, time of year, experience of the staff and the amount of labor required. I’m an oddball. I don’t charge an hourly labor rate. I look at the job as a whole, prepare my quote and then subtract a bit (paying it forward, so to speak), so I can’t really provide a definitive pricing list for any other shops you might encounter elsewhere.
That said, in my humble opinion, a reasonable charge for a patch on an open field of tube is $150. If accessories need to be lifted in order to provide adequate coverage over a leak, $230 wouldn’t be off the charts. A rubrail job requires an enormous amount of prep, chemicals, elbow grease and finesse. You can expect to be charged $520 and up, depending on the size of your boat, whether there’s a DIY mess that must be removed and the quality of the fabric.
Granted, this may sound like a lot to those sailing close to the edge economically. But again, even if you find yourself working with a shop that charges more than I do, in the long run, it’s worth it.
A former whitewater rafting guide (and current Deadhead), Captain Zoey Zaleta is the owner of Offshore Rafting, with shops in Arapahoe, North Carolina, and Sebastian, Florida. She welcomes inquiries at offshoreraft@gmail.com and can also found on Facebook at “Offshore Rafting”
May 2020


")


