

On many boats, decks are cored with end-grain balsa or plywood with a fiberglass laminate on each side. It’s not unusual for moisture to find its way into this wooden core. Stanchion bases and chainplates often leak as a boat ages, and often holes are drilled in the deck for new hardware, anchoring systems or dinghy tie downs, and not properly sealed by coating the exposed core with epoxy resin. Over time, moisture intrusion leads to a rotten core, which in turn makes decks “spongy” and compromises the integrity of that portion of the boat.
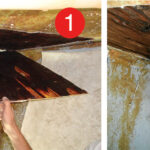
When friends on an Allmand 31 asked my husband, Dave, for advice about repairing cracks in the fiberglass near their bow cleats, Dave realized they had a much bigger problem than mere stress cracks. Upon further inspection, he found that the entire plywood core of the foredeck was rotten. Previous owners had cut holes for the anchor rode to pass through the deck into the bow locker without waterproofing the exposed edge of the core between the two laminates of fiberglass. The plywood had been reduced to a soggy sponge, no longer supporting the foredeck, which visibly undulated when the anchor rode pulled tight or someone walked on it. Bottom line: the core needed to be replaced.
Dave opted to remove the inside fiberglass laminate in order to replace the core, rather than cut through the fiberglass deck. It’s faster and easier to fair and finish the project if only the inside laminate is cut since the fiberglass is much thinner under the deck than above it. Also, by not cutting the deck there is no possibility of the new seam opening up later.
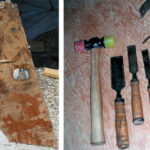
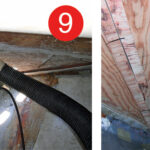
While our friend removed the various pieces of hardware from the foredeck (bow pulpit, cleats and chocks), Dave began in the forepeak. He marked a trapezoidal shape of interior fiberglass laminate to be cut out, leaving a 1½in lip at the forward end and both sides. This overhang of remaining fiberglass would later help support the replacement plywood. The exact size of the lip was not important; go with whatever works best with the existing hardware and the location of the rot. Dave used an oscillating saw with a titanium-coated blade to cut the core and the inside fiberglass laminate. When the interior laminate was cut, it took little effort to peel it off the rotted wooden core.
With the laminate and the wood removed, Dave next attacked the remaining core between the lip of interior fiberglass and the deck. To remove the rot he broke it into smaller pieces with a chisel and then used his deck caulking reeving tools (which resemble bent screwdrivers) to clean out these scraps of rotten wood. Once the area to be repaired was completely clear, it was time to build the replacement core.
The original core was ⅜in thick, but Dave decided to replace it with ¾in plywood. The demands on an older cruising boat are sometimes extreme, and the bow is often exposed to unpredictable loads when anchoring or mooring. Dave was hesitant to overbuild the repair (which can be just as dangerous as under building), but the owners will address the issue of the added weight forward with changes in stowage.
Using the laminate skin as a template, Dave built the replacement core in three pieces—two triangular side pieces and a trapezoidal middle section—for ease of handling and to help the core conform to any curve in the deck. Because the replacement core was thicker than the space between laminates, he marked off the distance of the overhanging lip of fiberglass and used a router to remove the extra thickness around the side edge of each board.
Dave then dry-fitted the port and starboard pieces, marking any spots where he needed to remove additional wood for a tight fit while still leaving enough room for a good epoxy coating on the plywood. When the two side pieces were a perfect fit, he measured the center piece, cut it out of ¾in plywood, and routed the forward end so that it fit under the lip of fiberglass there.
Using a grinder, Dave tapered the edges of the boards where they met the remaining laminate. This tapered area would make blending the two areas together with fiberglass tape easier later on. Since he also wanted to use 2in fiberglass tape to secure the three boards to each other, he routed out 1⅛in on the inside edge of the side boards and both sides of the inner board to accommodate the width and depth of the tape. This would allow the inside laminate to lie over the replaced core without leaving a bulge where the tape was.
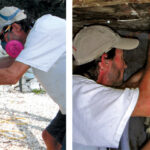
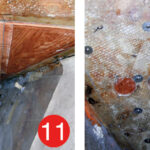
On the morning we were going to epoxy the new core Dave placed the epoxy resin in the refrigerator to allow for a longer cure time. Even though we were using slow-cure hardener, we knew that so much epoxy in a small area would cure more quickly than we could complete the job unless we slowed the cure time as much as possible. After that, we dry-fitted all three pieces again and screwed several screws with large finish washers into the new core from the outside. Because Dave would be replacing the inside laminate, he could not screw the core in place and it needed to be secured while he completed the installation.
Screening the forepeak off from the rest of the boat with plastic to minimize the mess, Dave taped a shop-vac hose to his sander and sanded every surface that would be epoxied. After wiping down the area with acetone, we were ready to install the new core.
Dave alway wears a respirator when sanding, and when we are dealing with acetone or epoxy, we wear respirators with volatile organic compound filters, gloves (which on messy jobs such as this one are taped around his wrists), long-sleeved shirts and hats. He should have been wearing a Tyvek suit as well. Though he usually works very cleanly, the small space made keeping epoxy off his skin very difficult. It’s important to keep it off your skin and to not breathe any of its fumes.

To protect the interior of the boat, we lined the hull and bunk in the forepeak with plastic before we began epoxying. While I mixed eight pumps of resin and hardener at a time, Dave used a chip brush to apply neat (unthickened) epoxy to the plywood and the underside of the outside fiberglass laminate. This prevents the joint from being epoxy-starved when the wood soaks epoxy out of the thickened mixture used for gluing. Next, he used colloidal silica to thicken the epoxy to the consistency of frosting. Using a putty knife, he then pushed this thick mixture into the spaces between the two laminates. He also smeared this thickened epoxy onto the starboard piece, fitted it using a mallet, after which the owner secured it from above with screws, as we had practiced earlier.
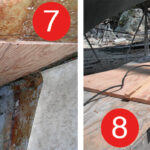
Dave repeated the process on the port side, directing the placement of additional screws as necessary to pull the wood and laminate together to prevent voids. As he did so we were careful not to tighten the screws to the point that all the epoxy was squeezed out, leaving nothing to adhere to the wood and fiberglass. After the middle piece was installed in the same manner, Dave laid two strips of fiberglass tape along the seams where the three pieces joined. Next, he coated the laminate skin with neat and then thickened epoxy and screwed it to the new plywood core. Though he had planned to use fiberglass tape along all four outside edges of the laminate at, this time, he decided to wait until this portion had cured.
The next day he removed the screws, sanded down the edges of the inside laminate and epoxied the fiberglass tape to the edges of the laminate. He also squeezed thickened epoxy into the screw holes after countersinking them, after which the foredeck was ready for the hardware to be reinstalled.
When installing any hardware into a cored deck, it is best to drill an oversized hole and fill it with thickened epoxy. After this has cured, drill the size hole that is necessary to accommodate the hardware installation. This way, there is no exposed wood to allow moisture into the deck. Similarly, if you make a large hole, such as for a hawsepipe, in a plywood deck, coat the exposed wood with epoxy. For a cored deck, scrape out a ring of core from between the two laminates and fill this area with thickened epoxy. With proper treatment, deck laminate penetration will not lead to rot, and you’ll never have to worry about replacing the deck core.
Connie McBride and her husband, Dave, sailed away in 2002 on their 34ft Creekmore, Eurisko. After many years in the Caribbean, where they raised their three sons aboard, they are now empty nesters, meandering their way around the tropics
August 2016


")


