
 Photos by Sam Fortescure (left); courtesy of Bruntons (right)
Marine diesels are not quiet beasts, mine in particular. Its 30hp roar has long been a tiring necessity, emphasizing the quantity of energy being wasted in the form of heat and noise. I’ve long coveted the idea of a flexible coupling that might dampen the worst of the vibration, so when a new SigmaDrive unit from UK-based Bruntons (bruntonspropellers.com) became available for me to install on my Sadler 34 sloop I didn’t hesitate.
A flexible couple is a kind of constant-velocity joint that rotates without transmitting vibrations. At the same time, they allow up to 3 degrees deflection in any direction and can be sized and specified for most gearbox and transmission types up to 1,300hp. Comprising an inner sleeve that grips the prop shaft and a rear plate that fits directly to the gearbox output flange, the SigmaDrive contains several large ball bearings that allow it to flex especially smoothly. In most drive trains, it can be installed as a direct swap-out for your existing coupling, which in my case was a fairly standard polyurethane disc-type from R&D Marine. Here’s how I fitted my SD55 unit.
The well for the prop shaft on my Sadler 34 is a busy place, with exhaust, throttle cables and even ducting for the air heater all running through it. One of the main issues is access. Luckily, I found that the bolts on the R&D coupling I already had in place weren’t jammed tight, and most backed off easily enough using a 17mm spanner and a little elbow grease (although those on the shaft sleeve itself required some choice language and WD40 to loosen).
After that, with the old coupling out of the way and the prop shaft slid out a little, I took advantage of the opportunity to clean up behind the gearbox a little and replace the shaft seal. You can also clean the gearbox flange and the prop shaft, but don’t oil them.
My SD55 SigmaDrive unit came with four 40mm lengths of M10 studding that needed to be screwed into a set of pre-drilled holes. There were actually three sets of four holes already tapped into the unit, each slightly closer to the hub, and one of them should match up with whatever gearbox output coupling you might have. To figure out which, simply match up the studs with the holes on the coupling you’ve just removed. You shouldn’t have to force it. When the studs are in the correct holes for your setup, they will just slide into the old one. Once you’ve established the correct position, squeeze a bit of Loctite 290 thread lock fluid onto each stud and then screw them up as tight as you can with an Allen key.
The next step is to slide the prop shaft into the stainless steel sleeve in the center of the drive. When you order the unit, you will need to know the diameter of your prop shaft. If you don’t have that figure handy, take an exact measurement using a set of Vernier calipers. Remember, if you have a European-built boat, it may have a 25mm shaft, as opposed to a 1in shaft measuring 25.4mm.
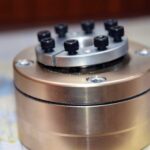
A feature of the SigmaDrive is that it can accommodate a few degrees of shaft deflection

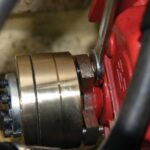
A closeup of the author’s original disc-type coupling still attached to the gearbox
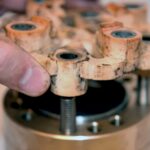
Fitting the old coupling to the drive to make sure the studs are correctly positioned
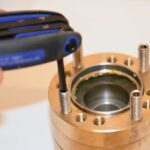
Once the studs are correctly positioned, screw them in with an Allen key
The new drive is shown here attached to the gearbox and ready for the shaft to be installed
Before you start, gently pop out the stainless steel taper sleeve that serves to grip the shaft out of the body of the SigmaDrive by giving it a few taps with a hammer. In my case, I also loosened the eight M6 hex bolts that are used to retain the sleeve when drive is in use and removed it completely. I did this because the end of my prop shaft is marked with a light scratch, and I needed to tap the sleeve into place over this mark with a hammer. After that, it was easy to screw the hex bolts back in and reattach. You’ll be surprised by how far the shaft fits into the SigmaDrive.
Before tightening these same bolts, lightly oil the sleeve on the outside to facilitate later removal. Be careful, though, not to oil between the shaft itself and the taper sleeve. That done, gently slide up the entire assembly until the four studs engage the output flange of the gearbox. With the studs in place, screw on the four M10 Nyloc nuts, remembering that there may not be sufficient clearance between the gearbox casing and the tip of the studs to fit the nuts if you immediately push the SigmaDrive flush to the gearbox.
The last step is to tighten up the eight black hex bolts securing the taper sleeve. Tighten them in a crisscross fashion, i.e., put a few turns on one side, then tighten the bolt opposite before moving back to the other side again. Repeat until they are tight. You will find the prop shaft is likely pulled an additional 3-4mm into the SigmaDrive—something to bear in mind if your prop already makes a tight fit next to the strut or deadwood of the keel.
In my particular installation, the entire prop shaft moved forward nearly a half-inch. If you can’t spare that kind of length, don’t worry. You can always re-insert the original plastic coupling between the SigmaDrive and the gearbox to push the shaft aft again. It won’t do any harm. And that’s it. I can hardly wait until spring to see how much more smoothly things will be running.
May 2020


")


