
 Photo courtesy of Solbian
What is the optimum method of installing solar panels? Duncan Kent explains how to get the best from your solar array
Having trawled through hundreds of “deals” to get the best price on the most efficient panels you can afford, you need to know how to install them to best fulfill your energy generation needs. Output, even from the highest quality photovoltaic (PV) array, will only be as good as the installation itself. Following these guidelines will ensure you extract every last drop of energy from your solar investment.
Mounting tips
Sailboats are not exactly the ideal place to mount a set of wide, flat PV panels. So before you go ahead and purchase what looks like the biggest and best, take a few minutes to decide on exactly where you are going to mount them, as this can affect what type of panels you should buy.
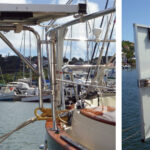
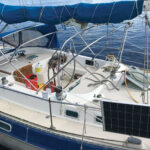
In most cases, the first choice will be on an arch or gantry aft, especially if your boat already has one, or you plan to fit one on. You can also build in some form of adjuster that will allow the panels to be orientated toward the sun for the best performance. With luck (or careful planning) a gantry will also keep your panels aft of the boom, thereby eliminating loss of output caused by boom shading.
The next most popular position is on a cockpit dodger, which will often mean using flexible or semi-flexible panels, as opposed to rigid ones.
In the absence of an arch, many cruisers who don’t want to mount panels atop a bimini choose to install them on the lifelines alongside the cockpit. This is usually accomplished by replacing the upper wire lifelines with stainless tubing, although there are other ways of doing it.
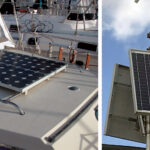
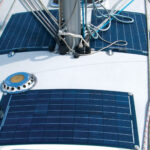
Finally, panels can be fitted directly to the deck, either by gluing them down using some kind of mastic or by fitting them to a rigid support. Once again, you may have to go with semi-flexible panels, especially if the deck surface is curved. Rigid, glass-coated panels will also not be suitable for mounting in an area that is frequently walked on. To allow for some air circulation behind the panels it’s best to apply the mastic in large dabs with substantial gaps between them. This can be achieved by using wooden spacer strips between the dabs until the mastic has cured.
 Photo courtesy of Adam Cort
Output Discrepancies
There’s often confusion as to how much power you can harvest from a solar installation. A PV panel is nearly always advertised stating its theoretical peak output power (Pw), but in reality, on a sailboat where there are limited areas in which to mount them, they will more likely produce a maximum of 60 percent of their peak output if mounted horizontally and 80 percent if tilted toward the sun and regularly adjusted. Even the latter, however, is rarely achievable as at anchor a yacht can swing through an arc of 180 degrees at any time due to wind or tidal shifts.
Another key to having an efficient system is avoiding shading. It’s no good fitting expensive, high-efficiency PVs right under the boom as they’ll perform little better than a cheaper type there. Saying that in a high-quality panel each cell will be isolated from the next by a series of diodes (one-way electrical valves), so that if one cell is shaded at least it won’t drag down the others.
Another important factor that few take into consideration when installing solar panels is overheating. If a panel gets too hot, which is very likely when mounted directly onto a flat surface with no air gap behind it, output will drop noticeably.
In Series or Parallel
Closely linked to the subject of shading is the question of whether to wire a set of PV panels in series or in parallel. The simple answer is that if there’s any danger of frequent shading to one or more of the panels then install them in parallel. The reason for this is that if wired in series, the shading of a single panel will drag down the output of all the others in the array.
That said, with the advent of MPPT (maximum power point tracking) controllers, there can sometimes be a benefit to wiring two or more identical panels into a series bank, thereby presenting a higher voltage to the controller. As a reminder, wiring a set of PV panels in series increases voltage, but the current remains the same. Wiring them in parallel does the opposite. As a result, series wiring might be worth it if your cable runs are very long, since this will cause a voltage drop. When wiring in series it’s also best to split the panels between each side of the boat, i.e. with one series bank to port and the other to starboard. If you do this, also fit a separate controller to each series PV bank and connect their outputs together in parallel to the battery bank.
 Illustration by Pip Hurn
Cable Size and Connectors
Another frequent cause of reduced output is incorrectly sized wiring. The resistance of a wire conductor increases in direct proportion to its cross-sectional area, so go as big as is practicable for the least cable loss. If you are combining panels, either in parallel or in series, you will also clearly need to rate the feed cable to suit the maximum current available at theoretical peak solar output. For instance, if you have four 150W panels joined together in parallel, the cable from the junction to the controller will have to be a minimum of 8AWG to carry the load safely and minimize voltage drop. Likewise, the cable from the controller to the batteries should be sized to suit the controller’s maximum output current.
In addition to having the correct size, it’s important to only use exterior-grade cable, which is double-insulated and UV-proof, in combination with weatherproof connectors that are compatible (MC4) with those found on the panels rather than cutting off the plugs and hard-wiring them. Field-assembly MC4 plugs are also available, so you won’t have to drill large holes in your decks or bulkheads when feeding the cables through. When joining more than one panel try to use the approved multiway connectors as these not only keep the wiring neat and tidy, but also offer a greater contact area than budget terminal blocks, which will reduce electrical resistance at the joint. Along these same lines, if you have to use screw-type connectors make sure to fit proper ferrules to the wire first to prevent any stray wires in the multistrand shorting across the terminals.
When feeding a cable from above to below, try to go through a vertical bulkhead wherever possible to minimize any pooling of water around the access hole. Also, be sure to employ a proper watertight cable clamp that matches the cable you’re using. Finally, when drilling through a cored deck don’t forget to drill a larger hole first, fill it with epoxy resin and then drill the required size hole through the solid epoxy plug to ensure no water gets into the deck core. Ideally, the charge controller should be mounted no farther than 7ft from the battery bank. If you really must go farther, you’ll need to go with even larger cabling to reduce voltage drop.

Charge Control
Whatever the size of your solar array, you will need to fit a charge controller to your system in order to regulate and extract the most output. As with panels, there’s a choice between numerous cheap, cloned units out there and a well-designed, carefully built device. There two types of controller currently available include PWM (pulse width modulation) controllers and the previously mentioned MPPT type. The former is usually basic and inexpensive, and while a good quality PWM will do the job, a much “smarter” MPPT unit will maximize your PV array’s output by constantly tracking peaks and troughs and varying its output to suit the actual condition of the batteries at any given time. Choosing the latter could give you up to 25 percent more usable power from the same array.
In practice, a solar charge controller works by disconnecting the PV panels from the batteries when the latter is fully charged. However, for some full-time liveaboards in sunny climates that can be considered a waste, since the excess power could be put to good use, say, heating water.
To do this, you can use an inverter to supply AC power to a heating element. Alternatively, you can buy a 12-volt DC element for your calorifier (hot water tank) and supply this directly from your battery bank. Both of these methods require a little clever circuitry, including a smart voltage-sensitive relay (VSR) to disconnect the element should the battery voltage drop below a preset level, but are still doable. Also, don’t expect boiling hot water, as there will probably only be enough spare power to take the chill off before your battery bank reaches its lower threshold voltage. For reference, a 600W/12V element will draw some 50A, from the batteries, whereas a 1kW AC element run through an inverter will need close to 100A. Note that if you choose to go the DC element route, don’t be tempted to try to run it via the “load” output on the charge controller. This is a low-power (usually 10A max) output primarily designed for lighting or low-power switch circuitry.
Finally, while some charge controllers come with an LCD to let you know what is going on, many don’t. It’s a lot better to have a proper numerical display than to rely on a few LEDs to tell you when something’s not right, so if your chosen controller doesn’t have one be sure to fit a battery monitor (the shunt type) into your solar circuit between the controller and the batteries. It doesn’t have to be a “smart” monitor, so to speak, just one that can display the voltage and current being supplied by the panels.
Device protection
Again, high-quality PV panels will feature built-in diode protection between each cell to prevent a shaded cell from dragging down the productive ones. In addition, there will likely be an internal blocking diode on the final output line to protect the panel from polarity reversal and to ensure your batteries won’t discharge back into the panel during the night. If necessary, the latter can be added externally, the former can’t so check with the dealer before you buy.
A fuse, rated just above the maximum current available, should always be fitted between each panel and the charge controller. Another fuse should then be installed between the charge controller’s output and the batteries. In the case of a multiple panel array, this second fuse needs to be rated higher than the individual panel fuses and should match the maximum current rating of the cable.
With this protection installed other charging devices can usually be connected in parallel at the battery, meaning the solar can be left connected even when you are hooked up to shore power and/or the battery charger is operating. In some circumstances, however, this arrangement can affect the sensing of the battery by the charger, causing it to fall back into float mode. If this becomes apparent, it can be overcome by installing a manual/auto switch to disconnect the solar array when on shore power.
September 2019


